Samsung has finally revealed its latest lineup of flagship smartphones. This includes the Galaxy S22, Galaxy S22 Plus, and Galaxy S22 Ultra. These phones come in gorgeous, vivid colors that make you admire the way they look. If you’re not a fan of them, though, you could always buy cases for the Galaxy S22 and Galaxy S22 Plus. Whether you plan to buy a Samsung Galaxy S22 model or not, you must be curious about the setting up process of these three phones. Or perhaps you are stuck somewhere and need help. Here’s how to set up the Samsung Galaxy S22, Galaxy S22 Plus, and Galaxy S22 Ultra.

How to set up the Samsung Galaxy S22, Galaxy S22 Plus, and Galaxy S22 Ultra

- When you first turn your Galaxy S22 phone on, you have to choose the language of your device. Hit Start when you’re done.

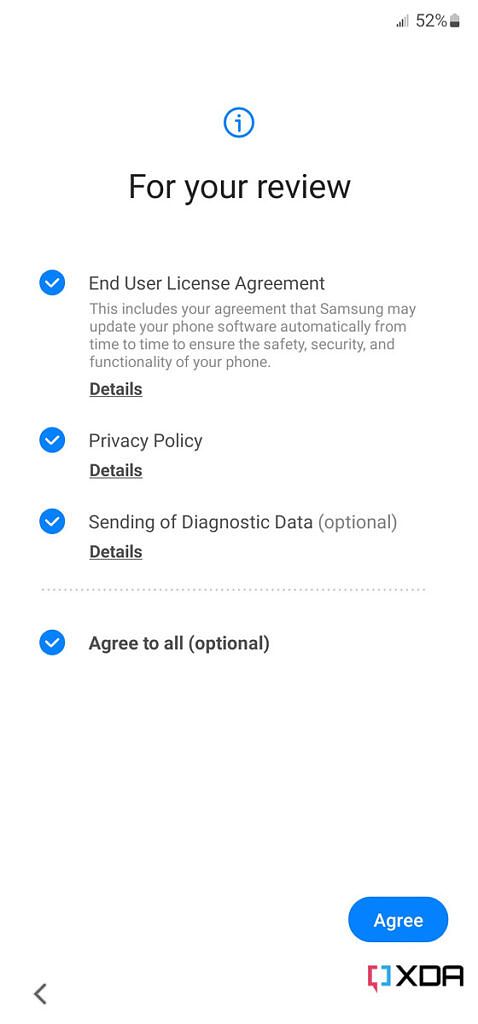
- Agree to the terms and conditions, in addition to the privacy policy. Note that you will not be able to proceed without accepting these. If you’d like Samsung to collect diagnostic data to improve their products, you can optionally enable that.


- Choose which of your data and sensors Samsung can access through its apps and services. If you deny certain permissions, some Samsung apps might have limited features or not work as expected. Samsung does provide brief explanations on what the permissions will be used for, so you can decide if it is worth granting right away. Once you decide what the company can access through its apps and services, click on Agree.

- Choose your home’s WiFi network from the list, and enter its password. This will allow you to complete the setup and use internet services on your smartphone.

- After you join the WiFi network, give your Galaxy S22 phone a few minutes. During this process, don’t click any buttons or attempt to turn it off. Doing so may interrupt the process and you may need to restart the update check.

- You will be prompted to sign in with your Google account. This allows you to use Google apps and services, such as the Play Store to download apps. Enter your Gmail address in this step, and then enter your Google’s account password on the next screen. If you have two-factor authentication (or 2-step verification) enabled, you will have to verify your identity through the method of your choice.

- Agree to Google’s terms and privacy policy after you read them. Alternatively, you can skip adding a Google account to your Galaxy S22. This lets you use the phone and comes in handy if you just want to check out the phone’s hardware functionality. However, for a very large part of the userbase, signing into a Google account is recommended to experience the full set of software features on the device.

- After you agree, give your phone a few seconds to contact Google servers.

- Decide if you want Google Drive to backup your data. This is a good idea, as you can then restore a lot of data on any future device. Similarly, the data stored in your account from past devices will be migrated onto this device as well.

- Choose which method you want to use to protect/lock your phone. Fingerprint authentication is one of the fastest and most convenient methods. You will still need to set a second layer of authentication if you use fingerprint authentication.

- As mentioned, using fingerprint as your authentication method will require a secondary authentication as well, so that up as well.

- Confirm the password or PIN you decide to go for by typing it twice.

- Decide if you want to enable the Hey Google hot word. This allows you to control your phone and ask for information hands-free.

- Choose whether Google Assistant can be accessed on the lock screen. The device warns you that someone with a voice similar to yours may be able to trigger the virtual assistant, though.

- Give your phone some time to complete its restore processes.

- Optionally, sign in with your Samsung account to access more features and services, such as the Galaxy Store. A Samsung account sign in is also needed to access the Samsung Members app, which is then used to run diagnostic tests on your device. A diagnostic test will tell you what features of the device are properly working, and it is a good check to perform when you take possession of a device (even moreso recommended for a second-hand purchase).

- Voila! Once you’re past that step, you’re ready to go! you can either click Finish to start using your phone or tap on Explore your Galaxy to read through more tips.
- The Samsung Galaxy S22 is the entry flagship for 2022, bringing over top of the line performance and camera capabilities in a form that fits many pockets and budgets.
- The Samsung Galaxy S22 Plus is the mid flagship for 2022, bringing over top of the line performance, display and camera capabilities in a larger housing for those that need to do more.
- The Samsung Galaxy S22 Ultra is the top flagship for 2022, bringing over top of the line performance, display and camera capabilities alongside S Pen capabilities to deliver an ultra experience for power users.
Which Samsung Galaxy S22 model did you buy, and why? Let us know in the comments section below.
The post How to set up the Samsung Galaxy S22, Galaxy S22 Plus, and Galaxy S22 Ultra appeared first on xda-developers.
from xda-developers https://ift.tt/9v0Lt8j
via IFTTT


Aucun commentaire:
Enregistrer un commentaire